This project showcase documents a real exterior painting project completed by A New Leaf Painting Contractors in the Secret Cove neighborhood of Jacksonville, FL 32216. This was not a straightforward color change. Before our crew applied a single finish coat, the project required T1-11 siding repair and replacement across multiple sections of the home, removal of deteriorated boards and existing felt, Z-channel installation, fascia replacement at the roofline, trim work around the utility meter box, extensive caulking and sealing, and surface preparation across two distinct exterior substrates — T1-11 siding and weathered coquina. After that preparation and repair work was complete, the exterior received two finish coats of Sherwin-Williams® Emerald® Rain Refresh™. For a full overview of how we approach professional exterior painting in Jacksonville, FL, visit our main Exterior Painting page.
Project Snapshot
| Project | Exterior Painting + T1-11 Siding Repairs & Replacement |
| Neighborhood | Secret Cove |
| Location | Jacksonville, FL 32216 |
| Service | Exterior House Painting |
| Surfaces | T1-11 siding, coquina, fascia, trim, exterior details |
| Repairs | T1-11 board removal and replacement, Z-channel installation, half-board replacement, fascia replacement (two pieces at roofline), trim installation and sealing around meter box |
| Preparation | Pressure washing, surface preparation of T1-11 and coquina, extensive caulking and sealing of joints and transitions, priming/sealing of repaired and new surfaces, masking and property protection |
| Finish Coating | Sherwin-Williams® Emerald® Rain Refresh™ |
| Finish Coats | Two |
| Contractor | A New Leaf Painting Contractors — Serving Northeast Florida Since 2001 |
More Than a Repaint: Repairing the Exterior First
When the condition of an exterior is what determines the scope of a project, the painting comes last — not first. On this Secret Cove home, portions of the T1-11 siding had deteriorated to the point where repair and replacement were necessary before any coating work could begin. That determination was made during the estimate walk, documented in the written scope, and completed before the first drop cloth went down for finish painting.
The process followed a clear sequence: evaluate the existing siding, identify which sections required board replacement versus preparation and repair, complete the carpentry and repair work, prepare and prime the new and existing surfaces appropriately, address caulking and sealing throughout, and then apply the finish coating system across the full exterior. Simply painting over deteriorated T1-11 would not have corrected the underlying substrate problem — it would have produced a painted surface over a compromised foundation, which fails faster and costs more to address later.
The photographs in this showcase document each stage of that sequence — from the scope annotations on the existing siding to the stripped wall with felt exposed, to the new boards installed and ready for priming, through to the completed exterior.
T1-11 Siding Repairs & Replacement
The Existing Condition — Before Repairs Began
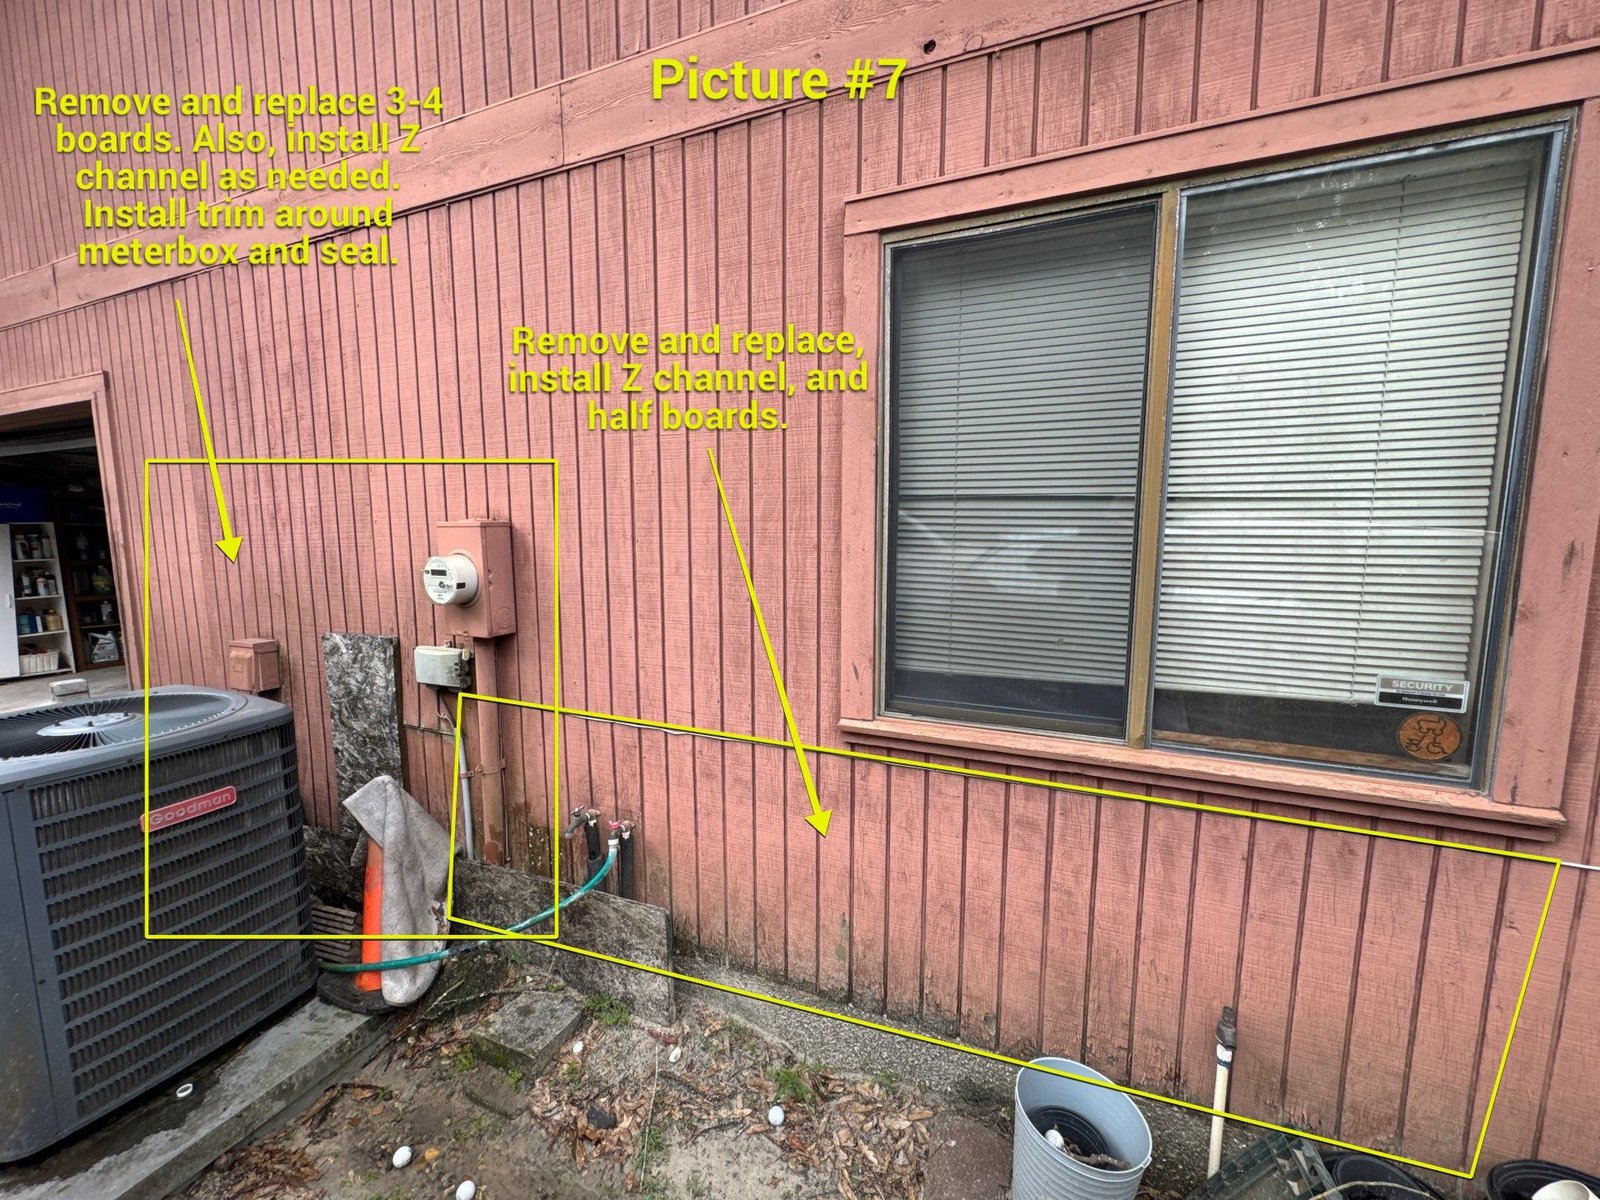
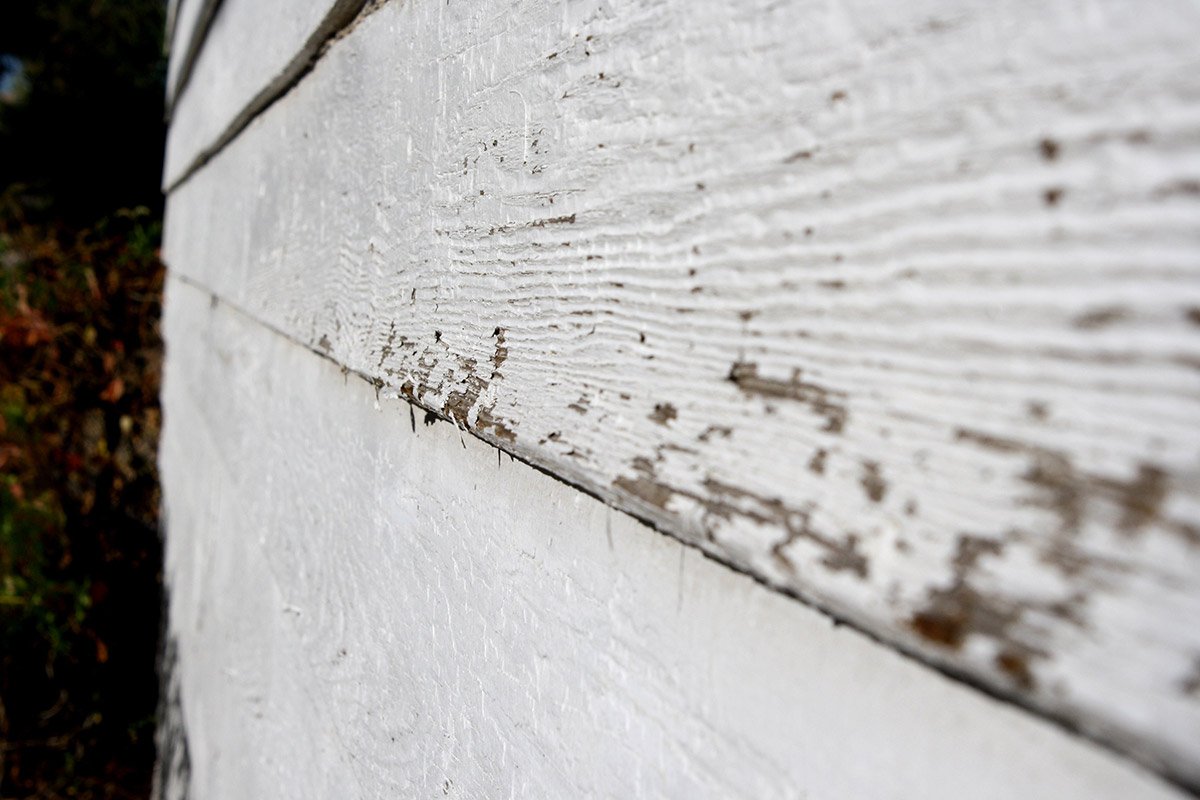
This close-up shows the T1-11 siding on one section of the home before any repair work began. The siding had reached a state of significant weathering and surface degradation. This view shows the utility meter box area — one of the sections identified in the written scope for board removal, replacement, and trim installation. The condition of the siding in this area is what the project photographs document before any repair work began.
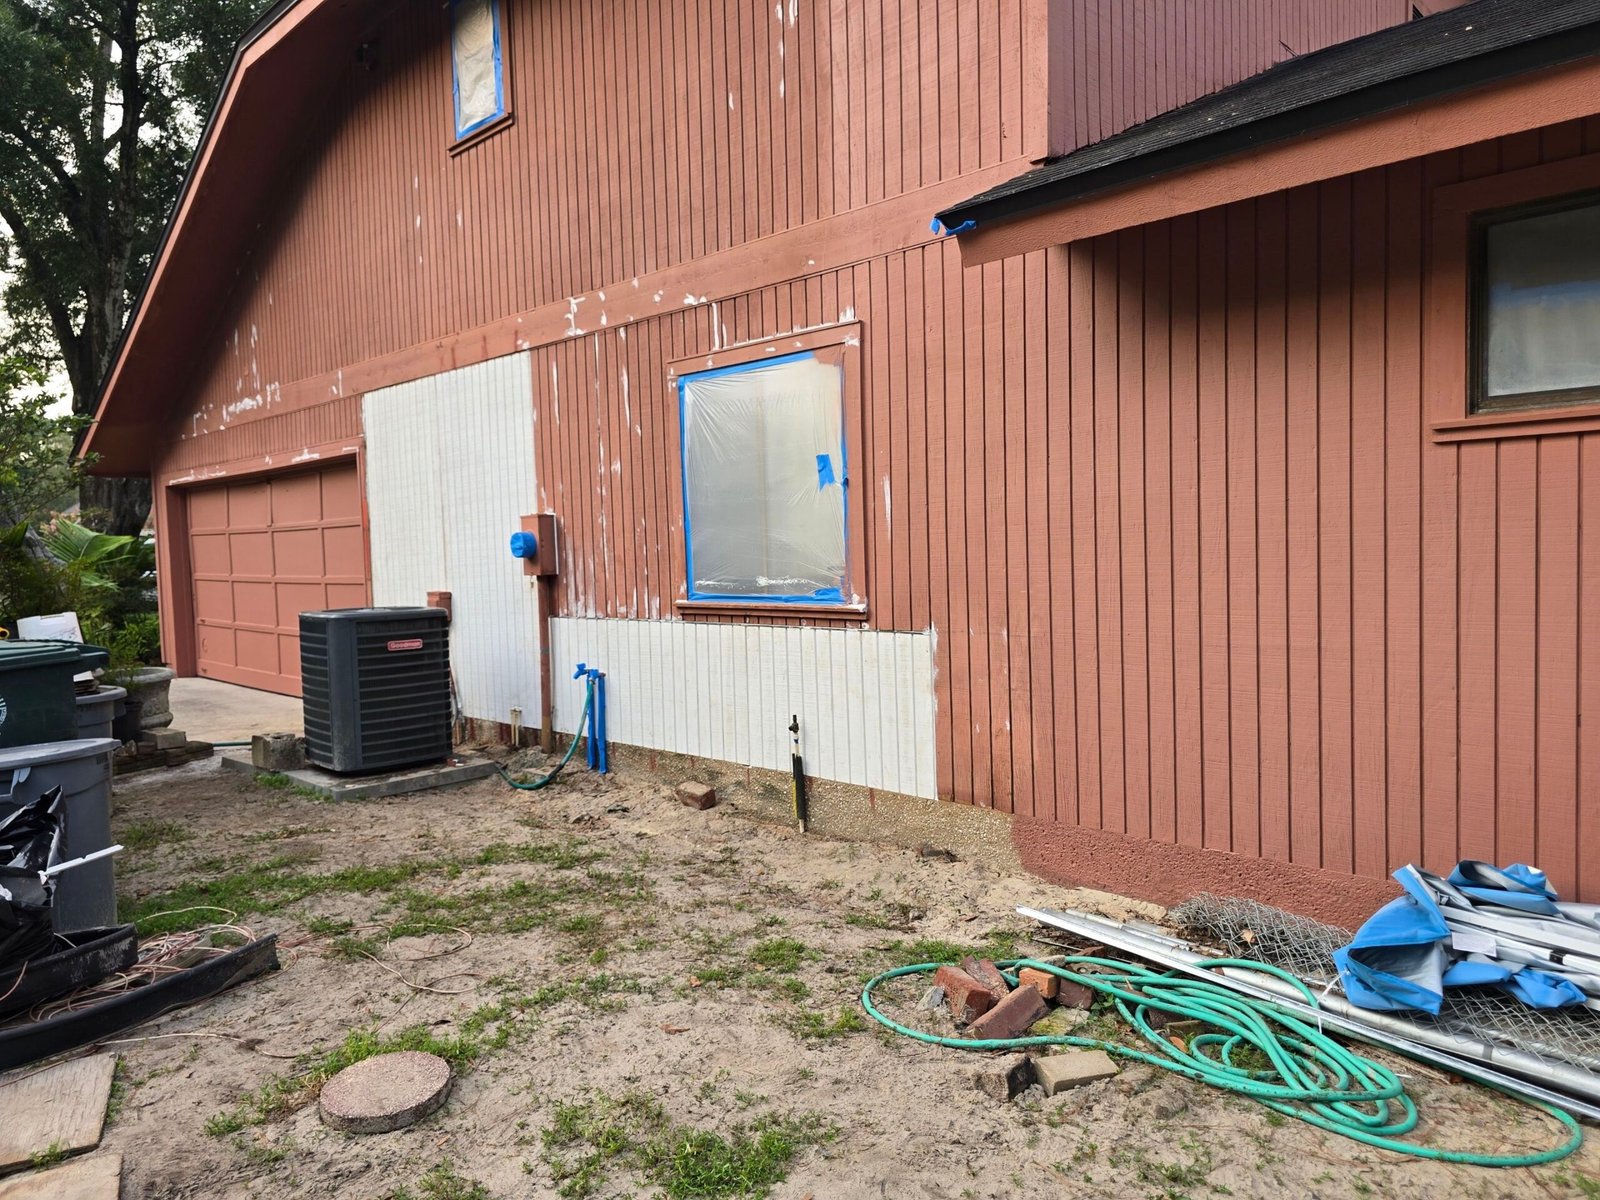
With the deteriorated T1-11 removed, new Z-channel and replacement panels were installed across the affected sections. The new T1-11 was properly prepared and primed before the finish coats were applied, helping create a consistent surface across both the repaired and existing siding. For additional context on the siding and carpentry work that sometimes precedes an exterior repaint, see our overview of exterior wood and siding repairs before painting.
Extensive Caulking & Exterior Preparation
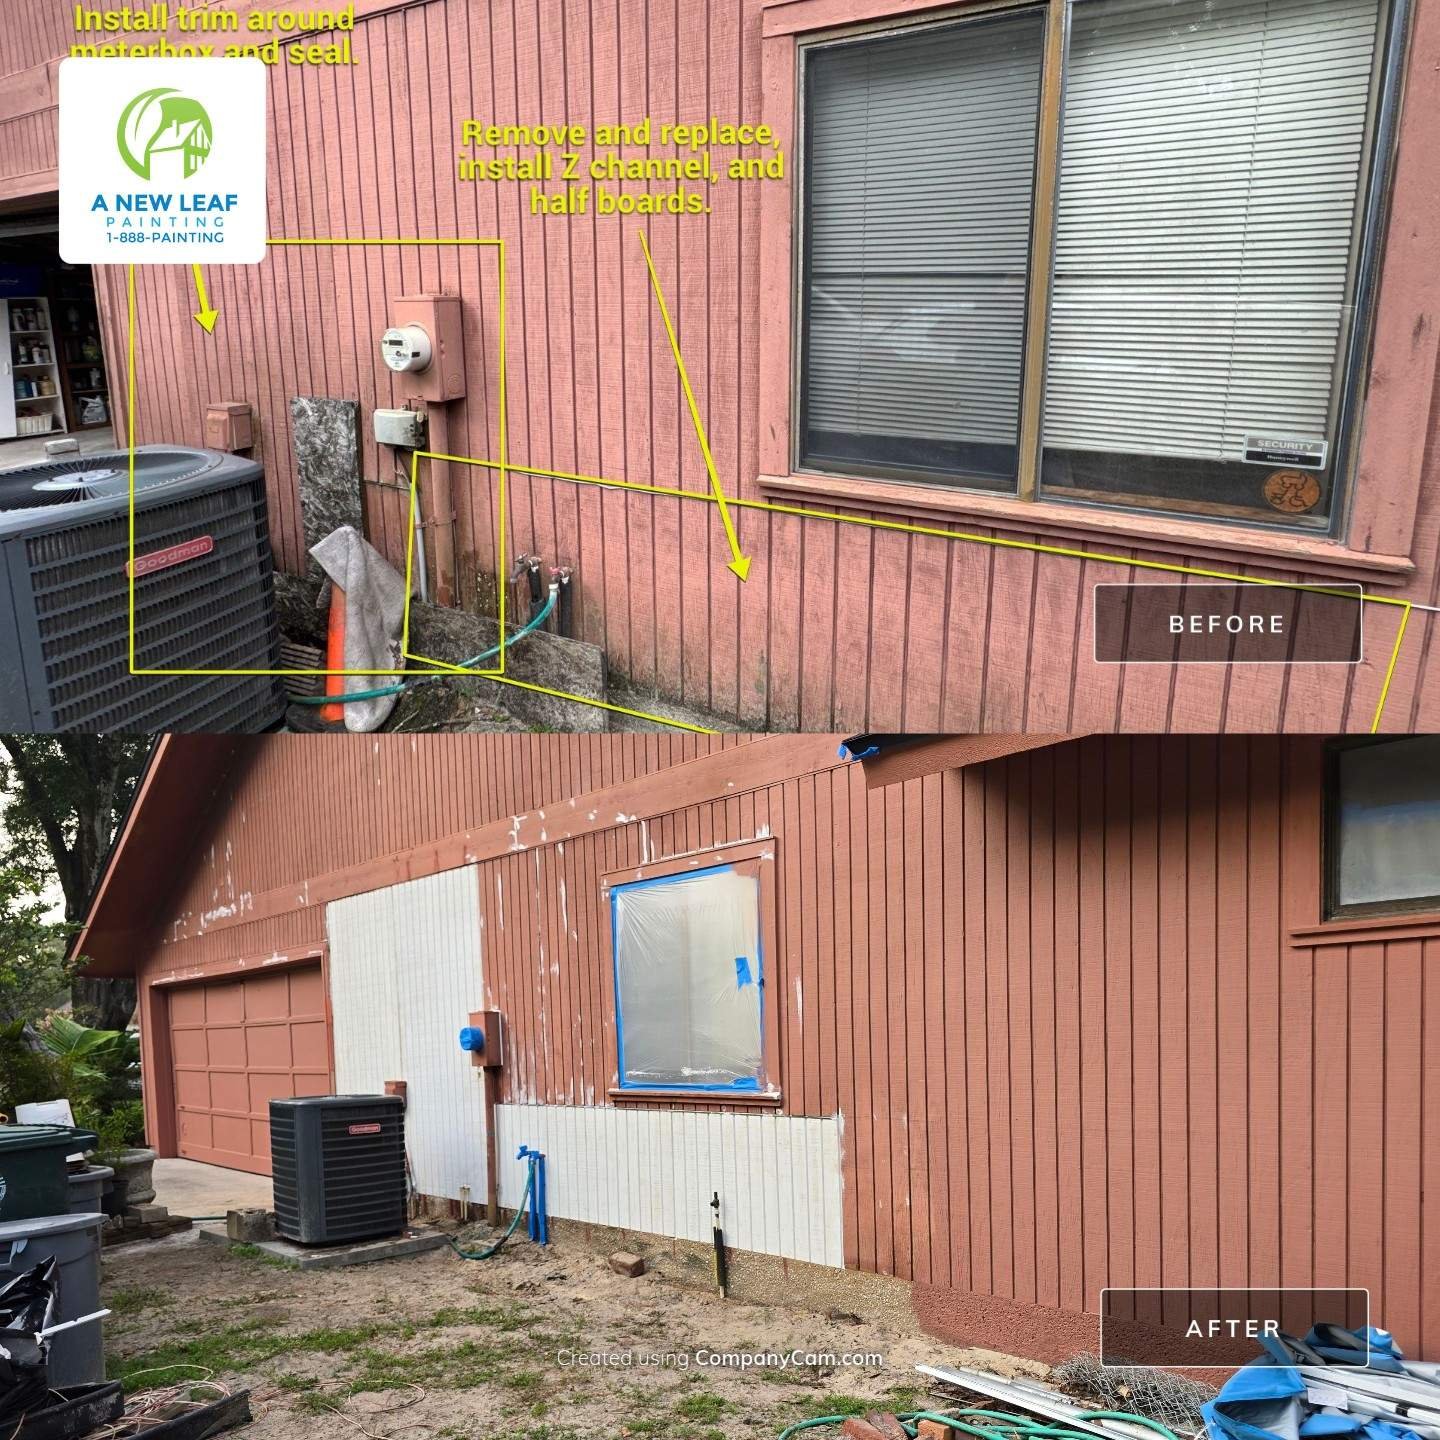
Preparation on this Secret Cove project was extensive — not incidental. The scope included pressure washing and cleaning of the full exterior before any repair or coating work began. Following the T1-11 repair and replacement work, all new and existing surfaces were prepared appropriately: new panels were primed, existing siding was prepared to receive finish coats, and all joints, transitions, and penetrations were caulked and sealed throughout the exterior.
The meter box area — identified in the scope annotations — received trim installation and sealing as part of the preparation work. Window and door perimeters, siding-to-trim transitions, Z-channel seams, and other appropriate joints were addressed before the finish coats were applied. T1-11 siding, particularly on a home that had reached the condition documented here, requires thorough joint sealing — open or deteriorated caulk joints allow moisture to migrate behind the panels, which accelerates the kind of deterioration that made the repair scope necessary in the first place.
Masking of windows, doors, and adjacent surfaces was completed before finish coating began. The finished paint is what homeowners see, but on a project like this, much of the important work happened before the first finish coat was applied.
Repainting the Weathered Coquina
This home included a prominent coquina chimney column on the front facade — visible in the before-and-after photograph — that was weathered, stained, and significantly different in appearance from the T1-11 siding walls on either side of it. Coquina is a naturally textured masonry material that presents different surface preparation considerations than T1-11 siding.
The existing coquina surface required cleaning to remove environmental staining and surface buildup before repainting. The texture of the material and its existing coating condition were evaluated as part of the preparation scope. Appropriate sealing and preparation of joints and transitions where the coquina met adjacent surfaces was included. The finished result — visible in the after photograph — shows the column repainted to a warm tan that reads as a distinct element from the refreshed T1-11 body color.
One home, two substrates, two different preparation considerations, one unified exterior painting project. That is the practical reality of older Jacksonville residential construction — and why an exterior painting scope has to account for what the house is actually made of rather than treating every surface the same way.
Two Coats of Sherwin-Williams® Emerald® Rain Refresh™
After the T1-11 repair and replacement work was complete, the new and existing surfaces were primed and prepared, and the full exterior was caulked and sealed, the finish coating system was applied. This project used Sherwin-Williams® Emerald® Rain Refresh™ as the exterior finish, applied in two coats across the T1-11 siding and included exterior surfaces.
Emerald Rain Refresh is a premium exterior acrylic latex coating in Sherwin-Williams’ Emerald product line, formulated with features relevant to Florida’s exterior painting environment — including humidity, UV exposure, and the rainfall conditions that Jacksonville homes experience through most of the year. Two finish coats were applied as specified for this project.
Product performance depends on what it is applied over. A premium coating applied over properly repaired, primed, and prepared surfaces performs differently than the same product applied over a compromised substrate. The repair and preparation work that preceded the finish coats on this project was part of the same scope — not a separate job — because proper substrate condition is what gives any coating system the foundation it needs. We do not make unsupported lifespan claims about any coating system. For more on how coating selection works across Jacksonville exterior projects, see our Exterior Painting Resource Center.
Secret Cove Exterior Painting Before & After
Before & After — Front Facade
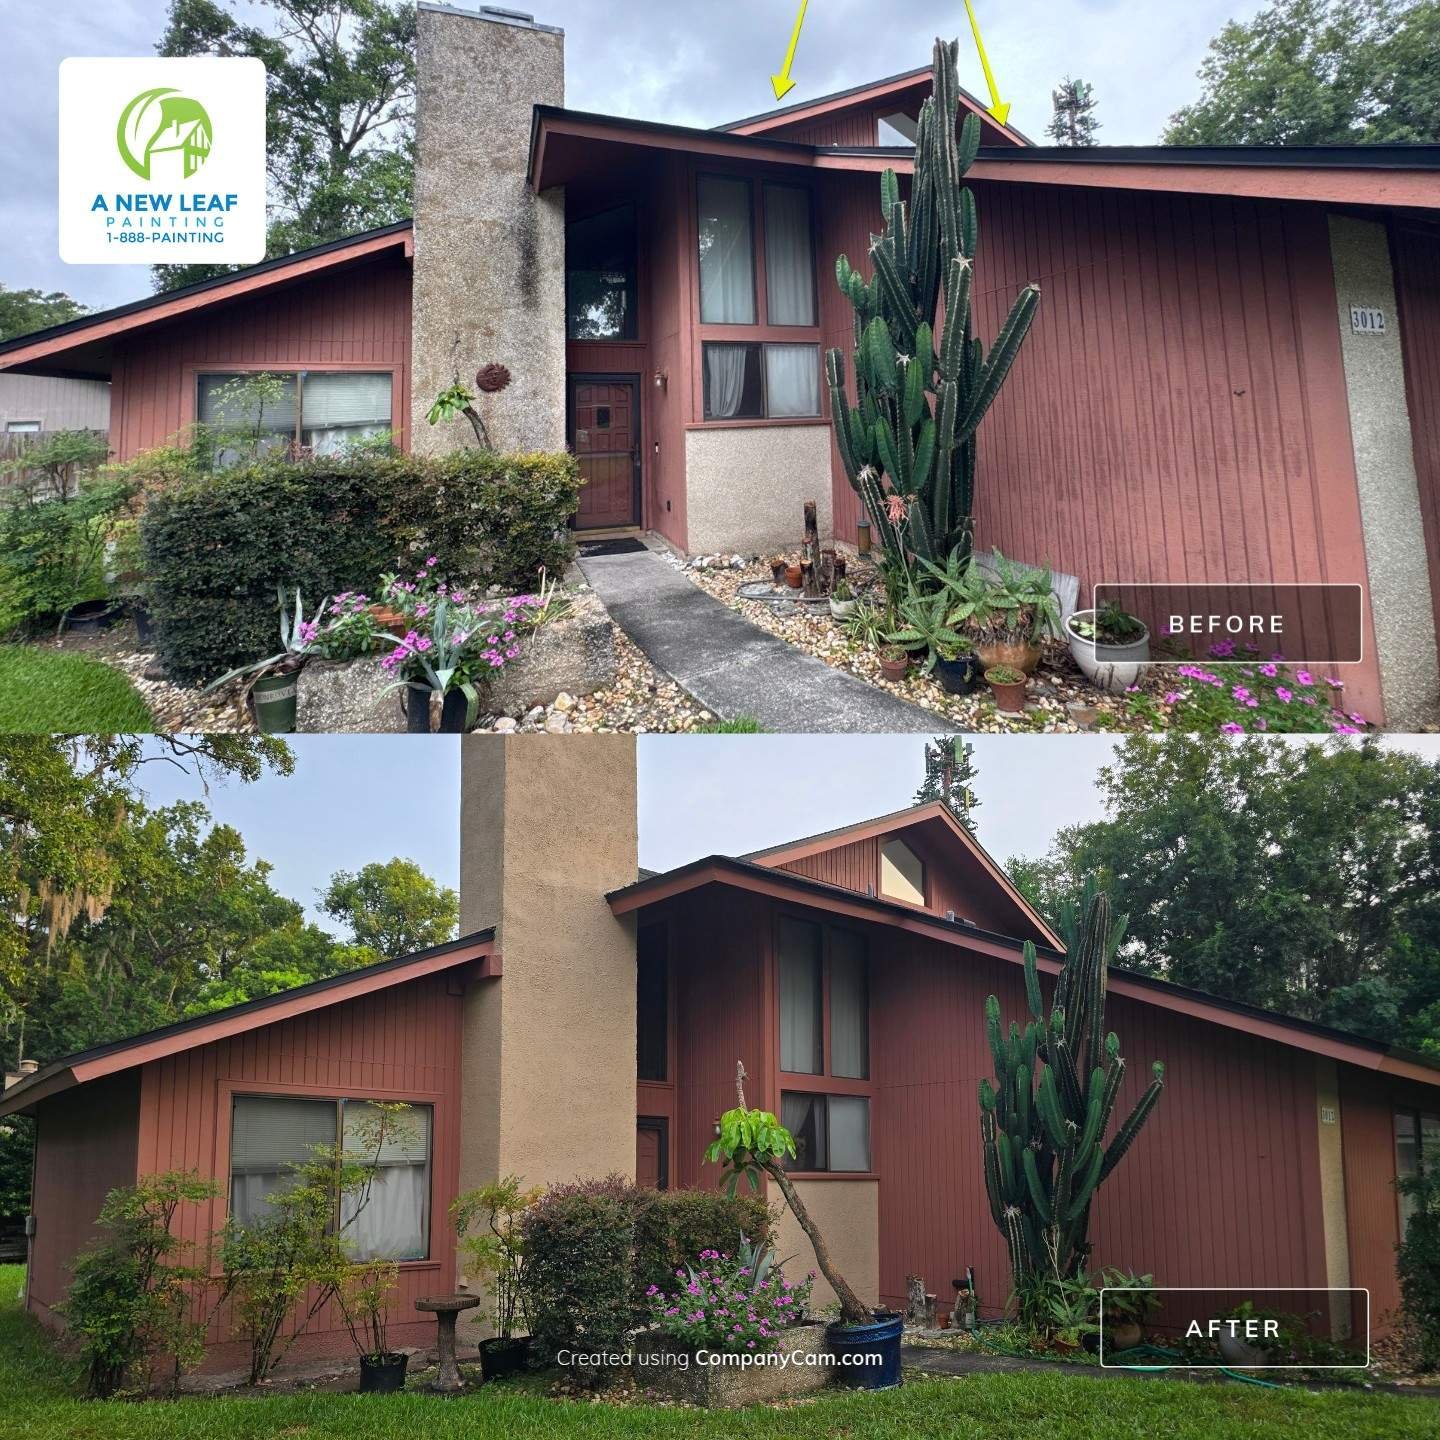
The full front facade before-and-after photograph (shown as the lead image above) shows what changed across the front elevation. In the before image, the T1-11 siding reads as a faded, weathered salmon tone and the coquina chimney column is visibly stained and degraded. In the after, the siding carries a refreshed reddish-brown body color and the coquina column reads as a distinctly different warm tan — each substrate addressed and coated appropriately. The front facade reads as a cohesive exterior for the first time in some time.
Before & After — Side & Rear Elevation
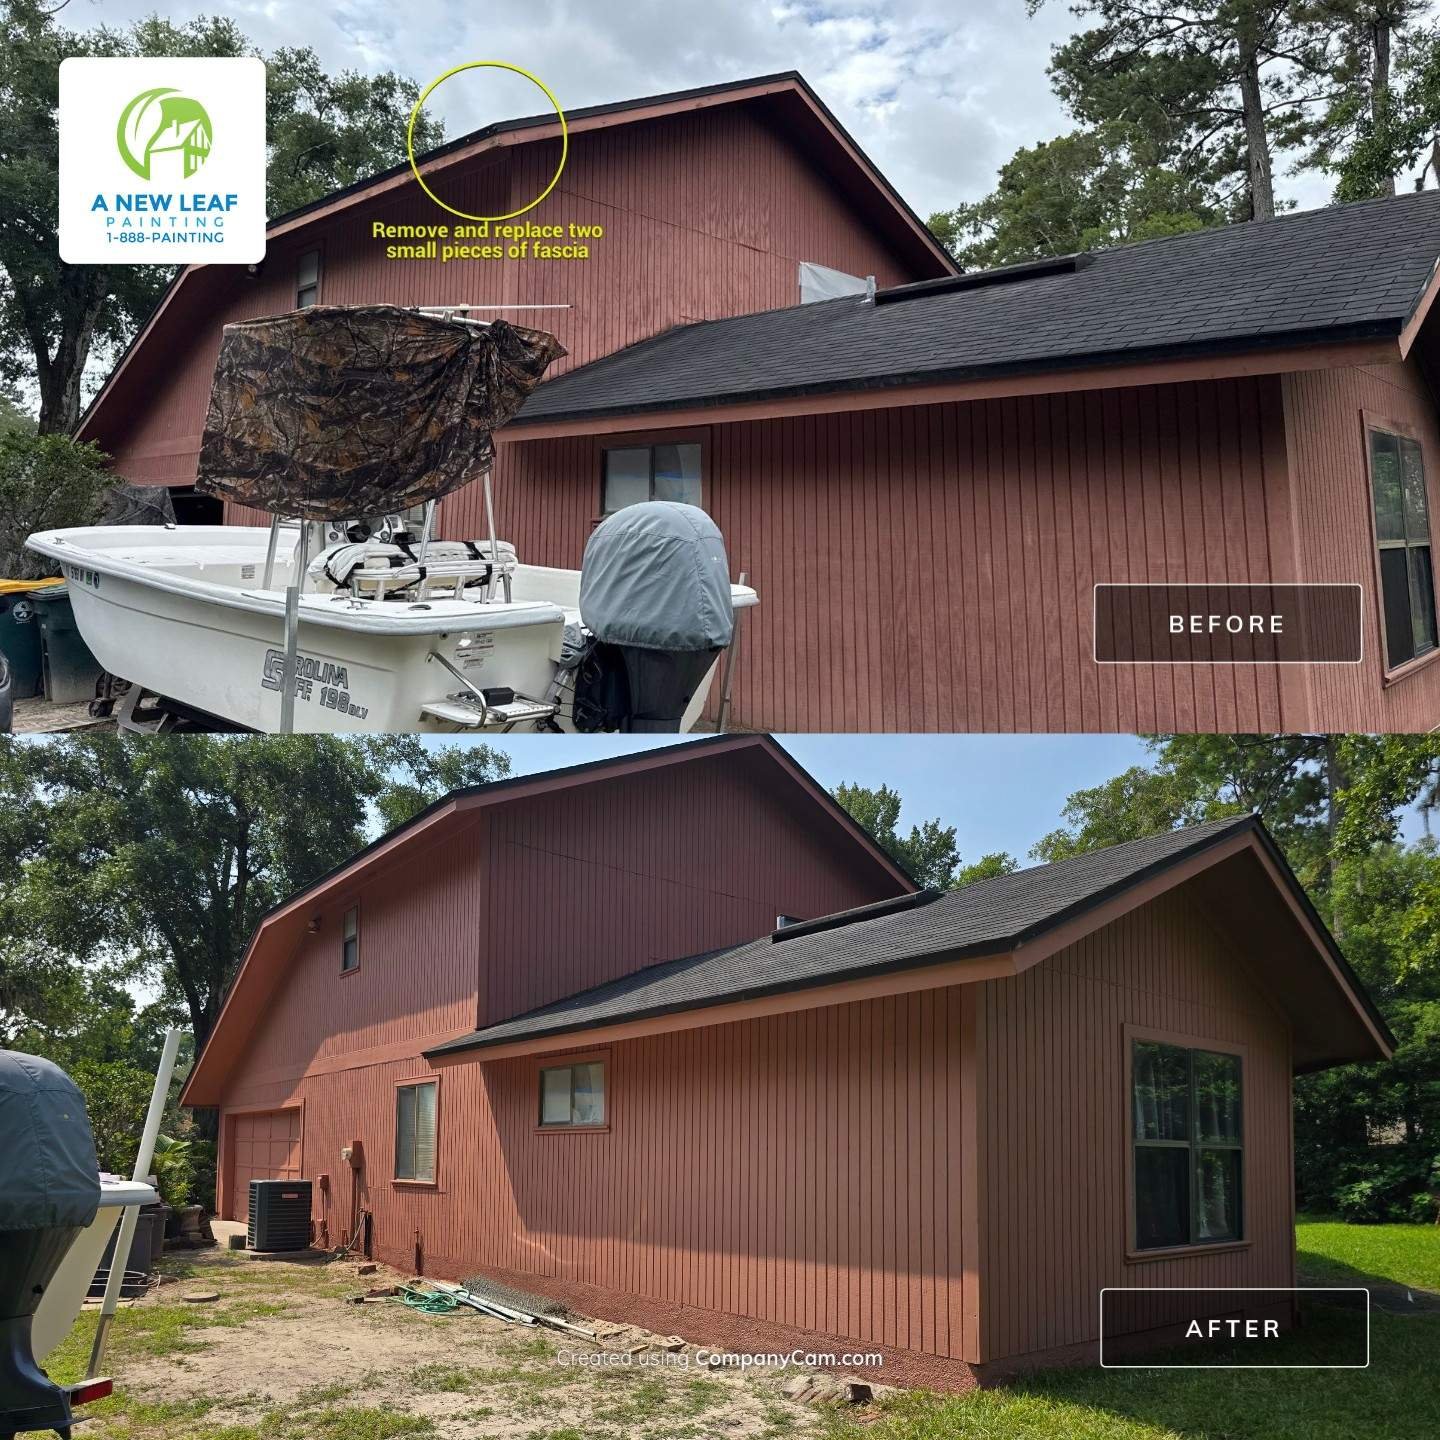
The side and rear elevation before-and-after shows the full coverage of the exterior repaint across this face of the home. The annotation in the before image marks the two small pieces of fascia that were removed and replaced at the roofline — visible in the after as a clean, continuous roofline edge. The full T1-11 siding face is refreshed with the new body color across all panels, including the sections that were repaired and replaced as part of the project scope.
What This Secret Cove Project Shows About Exterior Painting
Professional exterior painting is not simply applying paint over whatever is already there. On this Secret Cove home, the finished exterior required T1-11 board removal and replacement, Z-channel installation, fascia replacement, trim work, substrate exposure and re-sheathing in the most deteriorated section, priming of new material, extensive caulking and sealing, surface preparation of weathered coquina, and two finish coats of Emerald Rain Refresh — all as part of one exterior painting project.
One home can contain several exterior substrates, and each needs to be evaluated as part of the overall painting scope. The T1-11 siding and coquina on this home required different preparation and could not be approached the same way. The repaired sections and the original siding required different priming treatments before they could receive the same finish coat uniformly.
What the finished photographs show is the result. What they do not show is the sequence that made the result possible — and on a project with this much preparation, that sequence is the story.
Exterior Painting in Secret Cove & Jacksonville 32216
Secret Cove is an established Jacksonville neighborhood in the 32216 zip code. This project is a good example of why Jacksonville exterior painting scopes sometimes involve more than one substrate. This home combined T1-11 siding, coquina, and exterior trim — with repair and preparation requirements that differed across those surfaces and had to be accounted for before any finish coating was applied.
A New Leaf Painting Contractors has been working on exterior painting projects in Jacksonville and across Northeast Florida since 2001. On Jacksonville exterior projects like this one, our crews regularly encounter homes that combine multiple exterior substrates — T1-11, coquina, stucco, wood trim — each requiring its own evaluation as part of a complete exterior scope. The Secret Cove project is a direct example of that: a home that needed more than a new color, and a scope that was built around what the exterior actually required.
Planning an Exterior Repaint in Jacksonville?
If your Jacksonville home has deteriorated siding, weathered coquina or stucco, failed caulking, peeling coatings, wood or siding repairs needed before painting, or is simply due for a complete exterior repaint, A New Leaf Painting Contractors can evaluate the existing surfaces and develop a written scope based on what your home actually needs — not a one-size-fits-all proposal.
Learn more about our exterior painting services in Jacksonville, FL.
Or call us directly to schedule a free estimate:
904-615-6599
A New Leaf Painting Contractors · Serving Jacksonville and Northeast Florida Since 2001 · Fully Licensed and Insured