Spraying Painting Kitchen Cabinets
If you’re looking to give your kitchen a budget-friendly makeover, spray painting kitchen cabinets can be a game-changer. Not only is it a cost-effective way to update your space, but it also allows for a more professional and polished finish. However, before you start spraying kitchen cabinets, there are some important things you need to know to ensure the best results. In this blog post, we’ll cover everything you need to know about spray painting kitchen cabinets, from preparation to technique, so you can transform your kitchen with confidence.
Understanding the Basics of Spray Painting Cabinets
If you’re looking to give your kitchen a facelift without breaking the bank, spray painting your kitchen cabinets can be a game-changer. This cost-effective method not only updates your space but also provides a professional-looking finish that can completely transform the look of your kitchen.
Before you dive into spray painting, it’s important to understand the basics. One of the key factors to achieving a high-quality spray finish is using the right equipment. HVLP (High Volume Low Pressure) sprayers are commonly used for professional spray painting cabinets as they provide an extra smooth and even application of paint. While these sprayers can be expensive, they are definitely worth the investment if you’re planning to take on multiple painting projects.
Preparation is also crucial for a successful spray painting project. Clear off your counters and empty your cabinets to provide ample workspace. Be sure to tape off everything, including the floor and ceilings, to protect them from overspray.
By understanding the basics of spray painting, you can achieve a professional-looking finish that will update your kitchen and give it a fresh new look. In the following sections, we’ll delve deeper into the prepping process, choosing the right paint and equipment, and provide a step-by-step guide to spray painting your cabinets.
Prepping Your Kitchen Cabinets for Spray Painting
Before you can dive into the exciting part of spray painting your kitchen cabinets, you need to properly prep your space. This step is crucial for achieving a flawless finish that will last. First, you’ll need to clear off your countertops and remove everything from inside your cabinets. This will provide you with ample workspace and prevent any paint splatters or drips from damaging your belongings. Next, take the time to clean your cabinets thoroughly. Use a mild detergent and warm water to remove any grease, grime, or dirt. Allow them to dry completely before moving on to the next step.
Once your cabinets are clean and dry, it’s time to protect your surroundings. Cover your countertops, floors, and any other nearby surfaces with drop cloths or plastic sheeting to prevent them from getting accidentally sprayed with paint. Use painter’s tape to cover any areas you don’t want to paint, such as hinges or hardware.
Lastly, if you’re working with wooden cabinets, you may need to sand them down lightly to create a smooth surface for the paint to adhere to. Fill in any imperfections or dents with wood filler and sand them down until they are smooth. Be sure to wipe away any dust before you start painting.
By properly prepping your kitchen cabinets, you’ll set yourself up for success and ensure a professional-looking finish. Don’t rush through this step – taking the time to prepare your space will make a world of difference in the end result.
Choosing the Right Cabinet Paint and Equipment for the Job
Choosing the right paint and equipment for your spray painting project is essential to achieving a professional and long-lasting finish. When it comes to paint, you’ll want to select a high-quality, durable paint that is specifically formulated for cabinets. Look for paint that is designed to withstand moisture, heat, and daily wear and tear. Additionally, opt for a paint with a smooth, satin or semi-gloss finish for easy cleaning and a polished look.
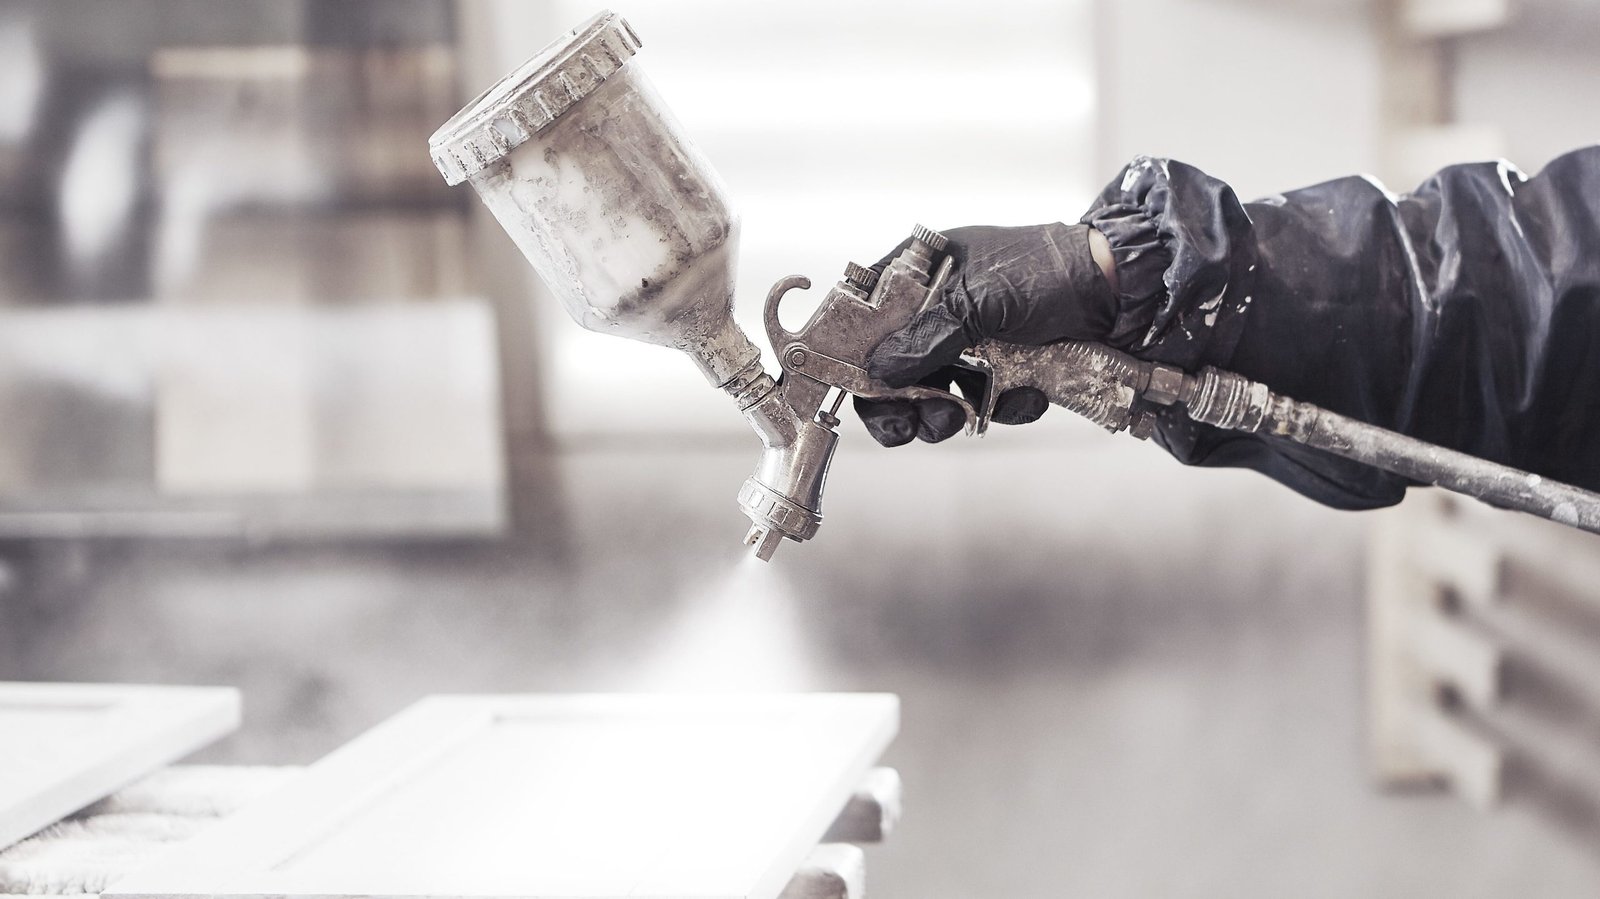
In terms of equipment, you’ll need a special sprayer to ensure an even application of paint. HVLP (High Volume Low Pressure) sprayers are the go-to choice for cabinet painting. These sprayers provide a fine mist of paint, resulting in a smooth and flawless finish. While they can be more expensive than traditional paint brushes or rollers, the investment is well worth it for the professional results they deliver.
When choosing your sprayer, look for one with adjustable settings for better control and coverage. Make sure to also consider the size of your cabinets and the amount of paint you’ll need, as this will help determine the capacity of the sprayer.
By selecting the right paint and investing in the proper equipment, you’ll be well on your way to achieving stunning and long-lasting results in your spray painting project.
Step-by-step Guide to Spray Painting Your Cabinets
Ready to transform your kitchen cabinets with a fresh coat of paint? Follow this step-by-step guide to spray painting your cabinets and achieve a professional-looking finish.
1. Start by gathering all the necessary materials. You’ll need a special sprayer, which can be a bit pricey, but trust me, it’s worth it for the results you’ll achieve. Additionally, gather your chosen paint, drop cloths or plastic sheeting to protect your surroundings, painter’s tape, and a mask and goggles for your safety.
2. Begin by removing the cabinet doors and hardware. Lay them flat on your protected workspace. This will make it easier to paint and ensure a smooth finish.
3. Before you start spraying, it’s important to test your equipment and adjust the settings accordingly. Practice on a piece of cardboard to get a feel for the sprayer and make any necessary adjustments.
4. Once you’re ready to start painting, hold the sprayer about 6 to 8 inches away from the surface and apply the paint in even, overlapping strokes. Keep your hand moving steadily to avoid any drips or splotches.
5. Start with the backside of the cabinet doors and work your way to the front, allowing ample drying time between coats. It’s better to apply several thin coats rather than one thick coat to avoid drips and uneven coverage.
6. Once the cabinets and doors are dry, carefully reinstall the hardware and hang the doors back in place.
Remember, patience and attention to detail are key when spray painting cabinets. Take your time and follow these steps, and you’ll achieve a stunning, professional-looking finish that will completely transform your kitchen. Happy painting!
Best Practices and Mistakes to Avoid in Spray Painting
When it comes to spray painting kitchen cabinets, there are a few best practices you should keep in mind to ensure a successful outcome. First and foremost, invest in a high-quality sprayer specifically designed for this task. Yes, it can be a bit expensive, but trust me, it’s worth every penny. Using cheap or inadequate equipment will only lead to frustration and subpar results.
Another best practice is to apply multiple thin coats of paint instead of one thick coat. This will help prevent drips, splotches, and uneven coverage. Take your time and allow each coat to dry thoroughly before applying the next one. Patience is key here.
In terms of mistakes to avoid, one of the most common is failing to properly prepare the surface before painting. Make sure to clean your cabinets thoroughly and remove any grease, grime, or dirt. Sand down any imperfections and wipe away the dust before you start painting.
Additionally, be mindful of overspray. Take the time to properly tape off and cover any areas you don’t want to paint, such as hinges or hardware. This will save you time and effort in the long run.
By following these best practices and avoiding common mistakes, you’ll be well on your way to achieving a professional-looking finish when spray painting your kitchen cabinets.
Maintenance Tips for Your Newly Painted Cabinets
Once you’ve successfully spray-painted your kitchen cabinets, you’ll want to take some maintenance measures to ensure that they continue to look great for years to come. Here are some tips to keep in mind:
1. Avoid harsh cleaners: While your newly painted cabinets may be able to withstand daily wear and tear, it’s still important to avoid using harsh cleaners that can damage the finish. Stick to mild detergents and avoid abrasive scrub brushes or sponges.
2. Be mindful of water exposure: Although the paint you use may be moisture-resistant, it’s still a good idea to be cautious around excessive water exposure. Wipe up spills promptly and avoid leaving wet items or sponges on the cabinet surface.
3. Handle with care: Your newly painted cabinets may look beautiful, but they still need to be handled with care. Avoid slamming cabinet doors or drawers and be mindful of any hardware that could scratch the surface.
4. Regular cleaning: Just like any other part of your kitchen, your painted cabinets will require regular cleaning. Wipe them down with a soft cloth or sponge on a weekly basis to remove any dust or dirt.
By following these maintenance tips, you can ensure that your newly painted cabinets continue to look stunning for years to come. Remember, the investment in a special sprayer and expensive spray equipment will pay off when your cabinets stay looking fresh and beautiful.